Create diagram connectors using drag and drop

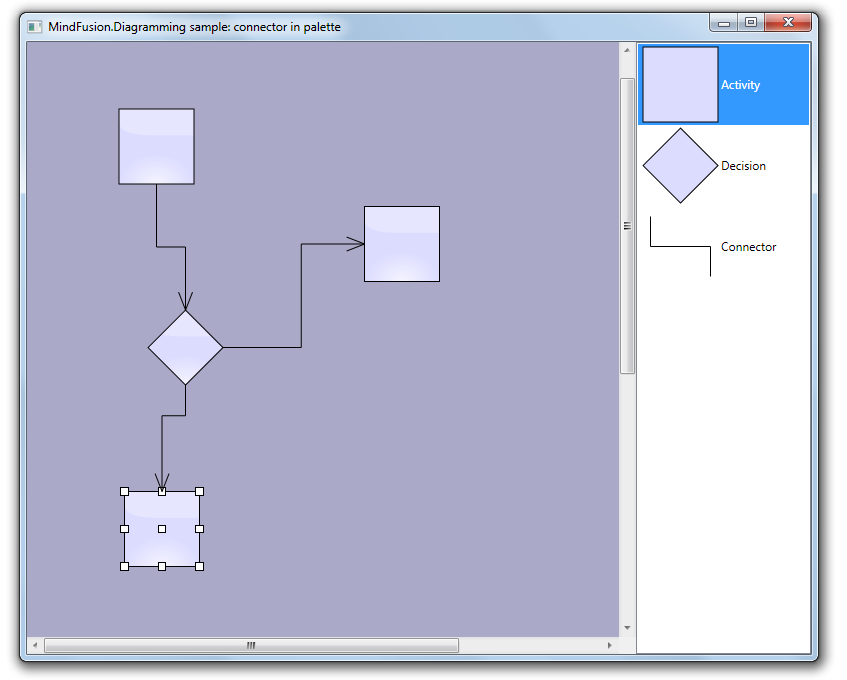
In this post we show how to create diagram links via drag-and-drop operation from a NodeListView used as a palette. Since the NodeListView control can contain only DiagramNode objects, we will create a custom node shape representing a connector. Once the dummy connector node is created, the NodeCreated event handler will replace it with a DiagramLink. In addition, the handler will find nearby nodes and automatically connect the link to them.

Let’s start with a new WPF project. Add a reference to mindfusion.diagramming.dll, and add Diagram and NodeListView controls to the window:

<ScrollViewer
	Grid.Column="0"
	Focusable="False"
	HorizontalScrollBarVisibility="Visible">
	
	<diag:Diagram
		x:Name="diagram"
		AllowDrop="True"
		NodeCreated="OnNodeCreated"
		NodeModified="OnNodeModified">
	</diag:Diagram>
	
</ScrollViewer>

<diag:NodeListView
	x:Name="nodeList"
	Grid.Column="1">
</diag:NodeListView>

In the Window constructor, create a custom node shape that will represent connectors:

var connectorShape = new Shape(
	null, // no borders
	new[] // decorations
	{
		new LineTemplate(10, 10, 10, 50),
		new LineTemplate(10, 50, 90, 50),
		new LineTemplate(90, 50, 90, 90)
	},
	null,
	FillRule.Nonzero, "Connector");

Add a few nodes to the NodeListView, along with the dummy connector node:

var item1 = new ShapeNode { Shape = Shapes.Rectangle };
NodeListView.SetLabel(item1, "Activity");
nodeList.Items.Add(item1);

var item2 = new ShapeNode { Shape = Shapes.Decision };
NodeListView.SetLabel(item2, "Decision");
nodeList.Items.Add(item2);

var item3 = new ShapeNode { Shape = connectorShape };
NodeListView.SetLabel(item3, "Connector");
nodeList.Items.Add(item3);

In the NodeCreated event handler, check if the newly created node represents a connector, and replace it with a DiagramLink:

var node = e.Node as ShapeNode;
if (node != null)
{
	if (node.Shape.Id == "Connector")
	{
		// replace the dummy connector node with a DiagramLink
		var bounds = node.Bounds;
		diagram.Items.Remove(node);

		var link = diagram.Factory.CreateDiagramLink(
			bounds.TopLeft, bounds.BottomRight);
		link.SegmentCount = 3;
		link.Shape = LinkShape.Cascading;

		ConnectToNearbyNode(link);
	}
	...
}

Otherwise if it is a regular node, set its anchor points and connect it to nearby unconnected links, if there are any:

else
{
	node.AnchorPattern = AnchorPattern.Decision2In2Out;
	node.Effects.Add(new GlassEffect());
	ConnectToNearbyLink(node);
}

The ConnectToNearbyNode method uses a LINQ query to find nodes in the vicinity of the link’s start or end point. If one is found at a distance shorter than 120 points, it is set as the link’s Origin or Destination.

private void ConnectToNearbyNode(DiagramLink link)
{
	// connect to a nearby origin node
	var origin = diagram.Nodes.OrderBy(n =>
		Utilities.Distance(n.GetCenter(), link.StartPoint)).FirstOrDefault();

	if (origin != null)
	{
		var distance = Utilities.Distance(origin.GetCenter(), link.StartPoint);
		if (distance < 120)
		{
			link.Origin = origin;
			link.Route();
		}
	}

	// connect to a nearby destination node
	var destination = diagram.Nodes.Where(n => n != origin).OrderBy(n =>
		Utilities.Distance(n.GetCenter(), link.EndPoint)).FirstOrDefault();

	if (destination != null)
	{
		var distance = Utilities.Distance(destination.GetCenter(), link.EndPoint);
		if (distance < 120)
		{
			link.Destination = destination;
			link.Route();
		}
	}
}

Similarly, the ConnectToNearbyLink method finds a nearby unconnected link and sets the specified node as the link’s Origin or Destination.

private void ConnectToNearbyLink(DiagramNode node)
{
	var outLink = diagram.Links.Where(l => l.Origin is DummyNode).OrderBy(l =>
		Utilities.Distance(node.GetCenter(), l.StartPoint)).FirstOrDefault();

	if (outLink != null)
	{
		var distance = Utilities.Distance(node.GetCenter(), outLink.StartPoint);
		if (distance < 90)
		{
			outLink.Origin = node;
			outLink.Route();
			return;
		}
	}

	var inLink = diagram.Links.Where(l => l.Destination is DummyNode).OrderBy(l =>
		Utilities.Distance(node.GetCenter(), l.EndPoint)).FirstOrDefault();

	if (inLink != null)
	{
		var distance = Utilities.Distance(node.GetCenter(), inLink.EndPoint);
		if (distance < 90)
		{
			inLink.Destination = node;
			inLink.Route();
			return;
		}
	}
}

The result of several drag and drop operation is displayed below.

The complete sample project is available for download here:
https://mindfusion.dev/_samples/LinkDragDrop.zip

Enjoy!

Custom appearance of WPF Resource view

Continuing from the previous post we will now customize the appearance of the Resource view to achieve a more aesthetically pleasing presentation. The appearance of the view is customized by setting various properties of the Calendar.ResourceViewSettings object.

We will build our presentation on the Silver theme by reducing the sharpness and contrast of colors and making the font uniform across the entire view. The customization process is divided to the following steps:

Customize the view background.

calendar.ResourceViewSettings.CalendarStyle.Background = Brushes.White;

Customize the row headers.

calendar.ResourceViewSettings.ExpandableRows = false;
calendar.ResourceViewSettings.HeaderStyle.FontFamily = headerFont;
calendar.ResourceViewSettings.HeaderStyle.FontSize = 13;
calendar.ResourceViewSettings.HeaderStyle.Foreground = new SolidColorBrush(Color.FromArgb(255, 64, 64, 64));
calendar.ResourceViewSettings.HeaderStyle.Background = Brushes.White;
calendar.ResourceViewSettings.HeaderStyle.BorderBrush = borderBrush;
calendar.ResourceViewSettings.HeaderStyle.BorderThickness = new Thickness(0, 0, 0, 1);

Customize the view cells.

calendar.ResourceViewSettings.CellStyle.Background = Brushes.White;
calendar.ResourceViewSettings.CellStyle.BorderBrush = borderBrush;
calendar.ResourceViewSettings.WeekendStyle.Background = new SolidColorBrush(Color.FromArgb(255, 250, 250, 250));
calendar.ResourceViewSettings.WeekendStyle.BorderBrush = borderBrush;

Customize the view timelines.

calendar.ResourceViewSettings.BottomTimelineSettings.CalendarStyle.Background = Brushes.White;
calendar.ResourceViewSettings.BottomTimelineSettings.CalendarStyle.BorderBrush = borderBrush;
calendar.ResourceViewSettings.BottomTimelineSettings.CalendarStyle.FontFamily = headerFont;
calendar.ResourceViewSettings.BottomTimelineSettings.CalendarStyle.FontSize = 13;
calendar.ResourceViewSettings.BottomTimelineSettings.CalendarStyle.FontWeight = FontWeights.Normal;
calendar.ResourceViewSettings.BottomTimelineSettings.NowFillBrush = Brushes.Transparent;
calendar.ResourceViewSettings.MiddleTimelineSettings.CalendarStyle.Background = Brushes.White;
calendar.ResourceViewSettings.MiddleTimelineSettings.CalendarStyle.BorderBrush = borderBrush;
calendar.ResourceViewSettings.MiddleTimelineSettings.CalendarStyle.FontFamily = headerFont;
calendar.ResourceViewSettings.MiddleTimelineSettings.CalendarStyle.FontSize = 13;
calendar.ResourceViewSettings.MiddleTimelineSettings.CalendarStyle.FontWeight = FontWeights.Normal;
calendar.ResourceViewSettings.MiddleTimelineSettings.NowFillBrush = Brushes.Transparent;

Note that the font, headerFont and borderBrush variables are defined as follows:

FontFamily font = new FontFamily("Segoe UI");
FontFamily headerFont = new FontFamily("Segoe UI Light");
Brush borderBrush = new SolidColorBrush(Color.FromArgb(255, 224, 224, 224));

The final result is displayed below.

scheduling-resourceviewappearance

The complete sample project is available for download here:
https://mindfusion.dev/_samples/WpfPlannerResourceViewAppearance.zip

You can get the trial version of MindFusion.Scheduling for WPF from this link:
https://mindfusion.dev/WpfPlannerTrial.zip

Enjoy!

Custom items in WPF Calendar

Expanding on the previous post we will now modify the appearance of the calendar items through the use of a custom item presenter. To define the new presenter, simply create a new Style resource with TargetType set to ItemPresenter and place this Style somewhere in the resource look-up path – for example in the application’s or the window’s resource dictionaries. The Style must contain a setter for the Template property that defines the appearance of the item:

<style targettype="{x:Type planner:ItemPresenter}">
  <Setter Property="Template">
    <Setter.Value>
      <ControlTemplate TargetType="{x:Type planner:ItemPresenter}">
        <Grid>
        ...
        </Grid>
      </ControlTemplate>
    </Setter.Value>
  </Setter>
</style>

In this particular case the presenter represents a grid with two rows. The top row contains an icon and the header text of the item. The bottom row contains the description text. Note, that the TextBlock displaying the header text of the item has a name – HeaderBlock. The element with this name defines the position of the TextBox when the item is in-place edited.

Various appearance properties are also customized – such as FontFamily, Background and BorderBrush, by assigning new values to the respective properties of the Calendar.ItemSettings.CalendarStyle object:

calendar.ItemSettings.CalendarStyle.FontFamily = new FontFamily("Segoe UI");
calendar.ItemSettings.CalendarStyle.Background = Brushes.White;
calendar.ItemSettings.CalendarStyle.BorderBrush = Brushes.SlateGray;

Finally, the size of the calendar lanes is increased to accommodate the new appearance of the items:

calendar.ResourceViewSettings.LaneSize = 54;

The final result is displayed below.

scheduling-customitems

The complete sample project is available for download here:
https://mindfusion.dev/_samples/WpfPlannerCustomItems.zip

You can get the trial version of MindFusion.Scheduling for WPF from this link:
https://mindfusion.dev/WpfPlannerTrial.zip

Enjoy!

Implementing drag & drop in MindFusion.Scheduling for WPF

In this post we will discuss how to implement drag & drop using MindFusion.Scheduling for WPF. The goal is to enable users to create appointments by dragging items from an external source and dropping them onto the Calendar control surface.

The source

For the purposes of this sample the drag & drop source would be a simple ListBox control. The following XAML declares a ListBox with several predefined items:

  Task #1
  Task #2
  Task #3
  Task #4
  Task #5
  Task #6

The calendar

To enable the Calendar control to be the target of drag & drop operations, set its AllowDrop property to true. The following XAML snippet illustrates the definition of the Calendar control:

<planner:calendar x:name="calendar" grid.column="1" currentview="ResourceView" grouptype="GroupByResources" theme="Silver" allowdrop="True">
  <planner:calendar.itemresources>
    <planner:resource name="Resource #1">
    <planner:resource name="Resource #2">
    <planner:resource name="Resource #3">
  </planner:resource></planner:resource></planner:resource></planner:calendar.itemresources>
</planner:calendar>

The calendar is set up to display three resources in a Resource view.

The drag & drop

The drag & drop operation is initiated by calling the DragDrop.DoDragDrop static method and passing a reference to the dragged data. In our case we would want to initiate drag & drop when the user clicks on an item in the ListBox and starts dragging. Because the MouseDown event is consumed by the ListBox when the mouse is pressed over an item, we need to handle the PreviewMouseDown event. The following C# code displays the handlers of the PreviewMouseDown and MouseMove events:

private void taskList_PreviewMouseDown(object sender, MouseButtonEventArgs e)
{
  mouseDown = e.LeftButton == MouseButtonState.Pressed;
}

private void taskList_MouseMove(object sender, MouseEventArgs e)
{
  if (taskList.SelectedItem != null && mouseDown)
  {
    mouseDown = false;
    string data = ((ListBoxItem)taskList.SelectedItem).Content.ToString();
    DragDrop.DoDragDrop(taskList, data, DragDropEffects.Copy);
  }
}

To give visual feedback to the user when the mouse moves over the Calendar control during drag & drop operation, handle the DragOver event:

private void calendar_DragOver(object sender, DragEventArgs e)
{
  e.Effects = DragDropEffects.None;
  if (e.Data.GetDataPresent(typeof(string)))
  {
    DateTime? date = calendar.GetDateAt(e.GetPosition(calendar));
    if (date != null)
      e.Effects = DragDropEffects.Copy;
  }
}

This handler checks whether the dragged data matches the expected type and whether the location under the mouse cursor represents a valid date.

Finally, handle the Calendar.Drop event. This event is raised when the user releases the mouse over the Calendar control during a drag & drop operation.

private void calendar_Drop(object sender, DragEventArgs e)
{
  if (e.Data.GetDataPresent(typeof(string)))
  {
    Point point = e.GetPosition(calendar);
    DateTime? date = calendar.GetDateAt(point);
    Resource resource = calendar.GetResourceAt(point);
    if (date != null && resource != null)
    {
      string task = (string)e.Data.GetData(typeof(string));
      Appointment appointment = new Appointment();
      appointment.HeaderText = task;
      appointment.StartTime = date.Value;
      appointment.EndTime = appointment.StartTime.AddDays(2);
      appointment.Resources.Add(resource);
      calendar.Schedule.Items.Add(appointment);
    }
  }
}

The following image shows the running sample with several created appointments:

Drag & drop

The source code is available for download from here:

Download the Complete Source Code for the Sample

You can get the trial version of MindFusion.Scheduling for WPF from this link:

Download MindFusion.Scheduling for WPF Trial Version

Drill Down Chart in WPF

In this post we discuss how to create a drill down chart with the MindFusion.Charting for WPF tool. Our main chart will be a pie chart, where each peace shows some aggregate data. When clicked, a new chart pops up – a bar chart, which shows details about the clicked piece.

The Data

For the data we use an ObservableCollection called CompanyExpenses. It contains objects of type Expenses. The Expenses class implements INotifyPropertyChanged. Here is a code snippet:

public class Expenses : INotifyPropertyChanged
    {
  public Expenses(string corporationName, double marketing, double salaries, 
            double rawMaterials, double logistics, double administration, double production)
        {
            this.corporationName = corporationName;
            this.marketing = marketing;
            this.salaries = salaries;
            this.rawMaterials = rawMaterials;
            this.logistics = logistics;
            this.administration = administration;
            this.production = production;
          
}

.............
}  

We have properties for the various company expenses and a property for the name of the corporation. We have a special Sum property, which gives us the total of all expenses for the corporation. This property will be used by the main chart – the pie chart:

public double Sum
        {
            get { return sum; }
            set
            {
                sum = value;
                OnPropertyChanged("Sum");
            }
        }

The Pie Chart

The pie chart displays the expenses of all 5 corporations – together with their name and their share. We use data binding, the ComapnyExpenses list provides the DataSource:

CompanyExpenses data = new CompanyExpenses();
 pieChart1.DataSource = data;

In order to show the name of the company as an outer label, we must set the OuterLabelType to CustomText and bind Expenses.CorporationName to the OuterLabelPath property. We do this in XAML:

my:PieSeries OuterLabelOffset="30" OuterLabelPath="CorporationName" OuterLabelType="CustomText" DataPath="Sum" InnerLabelType="Percents" Name="pieSeries1" DetachedPiecesList="20"

The Sum property, which we mentioned above, provides data for the chart. The brushes are set with the brush editor in the property grid.

Hit Testing

We use the charting component’s HitTest method to detect when a piece was clicked and to show a bar chart with the respective data. PiePiece.PieceIndex gives us the index of the clicked piece. We use the Control.MouseDown event to detect mouse clicks.

private void pieChart1_MouseDown(object sender, MouseButtonEventArgs e)
        {
            List result = 
                pieChart1.HitTest(e.GetPosition(pieChart1));

            if (result.Count > 0 && result[0] is MindFusion.Charting.Wpf.PiePiece)
            {
                MindFusion.Charting.Wpf.PiePiece piece = 
                    result[0] as MindFusion.Charting.Wpf.PiePiece;

                Details d = new Details(data[piece.PieceIndex]);
                d.Show();
            }
        }

The HitTest method returns a collection of ChartElement objects. In our case we don’t have several ChartElements that overlap each other and might be clicked simultaneously, that’s why we take the first ChartElement.

The Detailed Chart

The detailed chart is a bar chart that displays the data for a single Expenses object. We set the labels at the X-axis to display the type of the expense:

barChart1.XAxisSettings.LabelType = MindFusion.Charting.Wpf.LabelType.CustomText;
            barChart1.XLabels = new List() { "Marketing", "Salaries", "Raw Materials", "Logistics", "Administration", "Production"};
            barChart1.XAxisSettings.LabelRotationAngle = 30;
            barChart1.XAxisSettings.CustomLabelPosition = MindFusion.Charting.Wpf.CustomLabelPosition.ChartDataPoints;

When we create the Details window, we pass as argument the Expenses object the chart refers to:

public Details( Expenses expenses)
{
barSeries1.YData = expenses.ExpensesList;

}

The data for the bar chart comes from the list of the expenses, which is a DoubleCollection.

Here is a screenshot of the final drill down chart:

The main pie chart with the bar chart that shows details for the clicked pie piece.

The main pie chart with the bar chart that shows details for the clicked pie piece.

You can download the complete source code for the project from this link:

Download MindFusion.Charting Drill Down Sample