
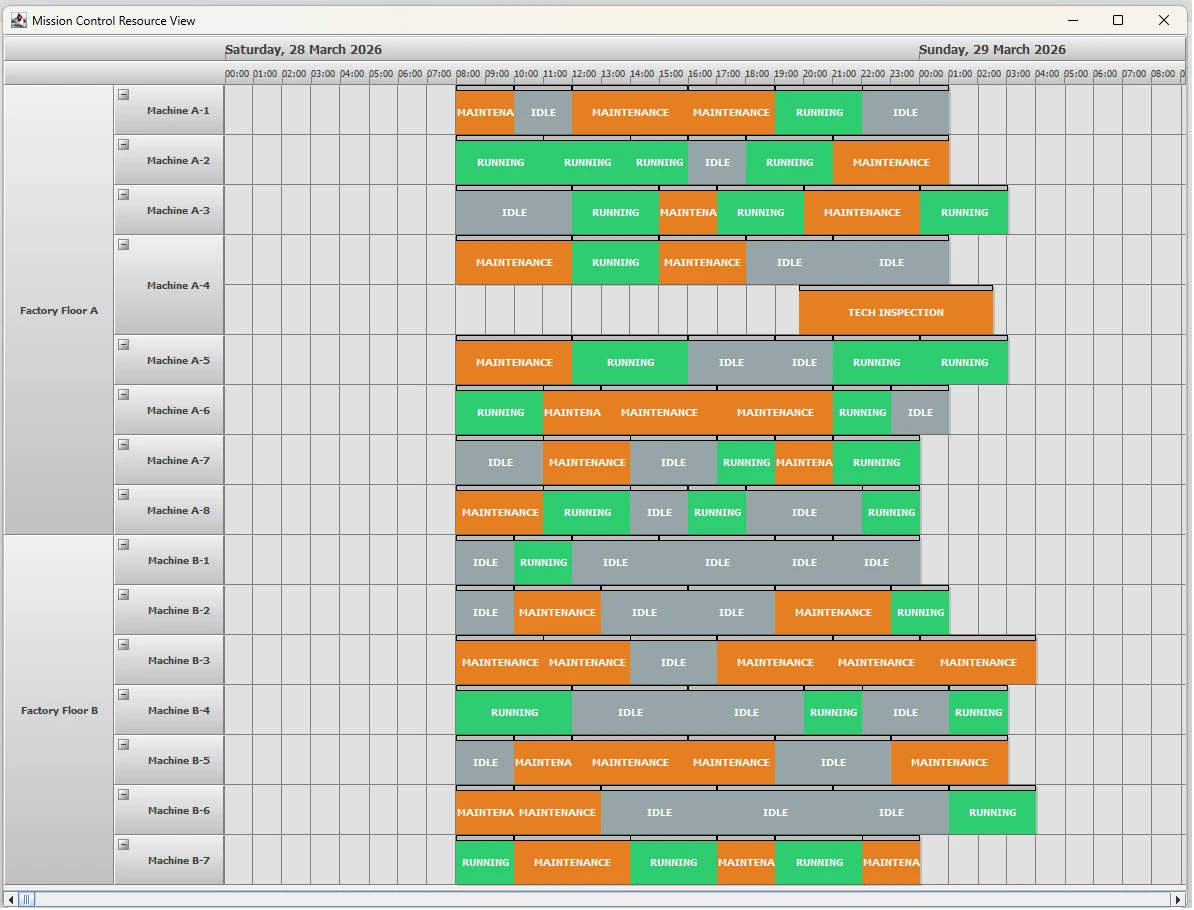
In enterprise environments like Manufacturing Execution Systems (MES) and Fleet Management, the “Mission Control” dashboard is the holy grail. It provides the ability to visualize hundreds of resources—machines, personnel, or vehicles—across a multi-day timeline while maintaining a clean, hierarchical structure.
In this post, we’ll explore how to use MindFusion Scheduling for Java Swing to create an enterprise-grade resource manager.
The Challenge: Visualizing High-Volume Data
Enterprise applications often struggle with visual clutter. Users need to see the “big picture” (e.g., Factory Floor uptime) while retaining the ability to drill down into specifics (e.g., individual Machine maintenance).
The Feature: The “Mission Control” Resource View
Our “Mission Control” demo highlights several valued enterprise features:
- Expandable/Collapsible Rows: Handle hundreds of resources by grouping them into logical departments or zones.
- Hierarchical Grouped Headers: Visualize parent-child relationships (Factory Floor -> Machine) with distinct branding.
- Color-Coded Status Blocks: Instant visual recognition of “Running” (Green), “Maintenance” (Orange), and “Idle” (Gray) states.
1. Defining the Resource Hierarchy
The foundation of a clean dashboard is a logical hierarchy. First, we make sure that grouping is enabled for both resource lanes: main and secondary:
calendar.setGroupType(GroupType.GroupByResources);
calendar.setSecondaryGroupType(GroupType.GroupByResources);
By using Custom Grouping, we can define a FactoryFloor as a parent resource for a collection of Machine objects.
// Define the 2-level grouping hierarchy
calendar.setCustomGroupType(FactoryFloor.class);
calendar.setCustomSecondaryGroupType(Machine.class);
By implementing the customizeGrouping event, the UI dynamically resolves which machines belong to which floor, ensuring the dashboard stays synchronized with the underlying data model. Grouping is applied by the primary resource first (floors) and then by the resources added second – machines.
2. Creating the Machines and Factory Floor Objects
The FactoryFloor and Machine classes both extend the scheduling library Resource class. FactoryFloor keeps a list of the machines. Node: you need to assign an ID to a Resource so it can be grouped by it – resources with the same ID are grouped together.
// set an ID to enable grouping by it
FactoryFloor floorB = new FactoryFloor();
floorB.setName("Factory Floor B");
floorB.setId("FloorB");

calendar.getResources().add(floorB);
Machines are also asigned an ID to have them grouped. They are also added to the list with machines for the respective FactoryFloor. Also, note that both FactoryFloor and Machine objects are added to the calendar resources:
// Create Machines and status items for 3 days
for (int i = 1; i <= 8; i++)
{
	Machine m = new Machine();
	m.setName("Machine A-" + i);
	m.setId("MA" + i);
	floorA.getMachines().add(m);
	calendar.getResources().add(m);
}
To prevent shift blocks from "collapsing" during a resize—a common issue when snapping to large units—we enabled Minute Snapping:
ResourceViewSettings settings = calendar.getResourceViewSettings();
settings.setSnapUnit(TimeUnit.Minute);
settings.setSnapUnitCount(1);
This provides a much smoother user experience, allowing for precision adjustments to machine uptime and maintenance windows. You can check the members of the ResourceViewSettings class for a list of the available options regarding customization of the view.
3. Visual Branding with Custom Drawing
To give the dashboard its "Mission Control" feel, we used custom drawing to brand the factory floor headers with distinct "Zones."
For that to work, we use a random integer - type - that we map to one of the 3 states for a machine: Idle, Running, Maintenance.
int type = r.nextInt(3);
This "type" is for our information only and we use it decide which text the newly-created Appointment receives and how it should be coloured.
// Custom drawing logic for hierarchical headers
// Visual Styling
if (type == 0) {
	app.setHeaderText("RUNNING");
	app.getStyle().setHeaderBrush(new SolidBrush(new Color(46, 204, 113))); // Emerald Green
} else if (type == 1) {
	app.setHeaderText("MAINTENANCE");
	app.getStyle().setHeaderBrush(new SolidBrush(new Color(230, 126, 34))); // Carrot Orange
} else {
	app.setHeaderText("IDLE");
	app.getStyle().setHeaderBrush(new SolidBrush(new Color(149, 165, 166))); // Concrete Gray
}
This ensures that "Zone Green" and "Zone Orange" are immediately recognizable, even in a high-density view.
4. Optimizing the 3-Day Shift View
For industrial scheduling, a single-day view is rarely enough. We expanded the viewport to show a 3-day work week and optimized the timeline scale to remain legible.
We specify that the time-span of the resource view is 3 days with the following code:
// Set Date Range for 3 Full Days
DateTime startRange = DateTime.today();
calendar.setDate(startRange);
calendar.setEndDate(DateTime.op_Addition(startRange, Duration.fromDays(3)));
To prevent shift blocks from "collapsing" during a resize—a common issue when snapping to large units—we enabled Minute Snapping:
ResourceViewSettings settings = calendar.getResourceViewSettings();
settings.setSnapUnit(TimeUnit.Minute);
settings.setSnapUnitCount(1);
This provides a much smoother user experience, allowing for precision adjustments to machine uptime and maintenance windows.
The Result: An Enterprise-Ready Dashboard
The final result is a professional, scalable dashboard that provides immediate value. With its hierarchical headers, status-synced bars, and precise interaction model, it represents the gold standard for resource scheduling in Java Swing.
Key Takeaways for Developers:
- Use Lanes:
ResourceViewStyle.Lanesis essential for Gantt-like status visualization. - Custom Draw: Don't settle for default headers; use gradients to denote "Zones" or "Priority."
- Sync the Brushes: Apply status colors (Green/Orange) to both the
BrushandHeaderBrushof your appointments for a unified look.
Download Full Source Code of the Sample
Ready to build your own Mission Control? Check out the online documentation to get started or visit the MindFusion Java Scheduling product page for more information about the library including features, licenses and discounts.