Tutorial 1: Getting started
This tutorial will show you how to set up your project to use MvcDiagram.
Go to File->New->Project. From the list of installed templates, choose ASP.NET Core Web App (Model-View-Controller) and hit Next. Enter "Tutorial1" as name of the application and press Next. On the next screen just press Create.
From Solution Explorer menu -> Dependencies -> Manage NuGet Packages, install the MindFusion.Diagramming.Mvc package.
The client script MindFusion.Diagramming.js should appear automatically in the wwwroot/js subfolder once the project is built. If you need to change the location of the MindFusion.Diagramming.js script, set the ClientScriptLocation property to configure the control:
C#
 Copy Code Copy Code
|
|---|
view.ClientScriptLocation = "/SomeFolder/MindFusion.Diagramming.js"; |
Open the Index.cshtml page, which is located below the Views->Home node in the Solution Explorer tree. Add references to the MindFusion.Diagramming.Mvc namespace:
| HTML
Copy Code
|
|---|
| @using MindFusion.Diagramming.Mvc |
Add a call to the HTML helper's DiagramView method by typing the following line:
| HTML
Copy Code
|
|---|
@Html.DiagramView((DiagramView)ViewBag.DiagramView, new { style = "width:800px; height:700px;" }) |
Open the controller class HomeController.cs, which is located in the Controllers node in the Solution Explorer tree. On top add the following references:
| C#
Copy Code
|
|---|
using Microsoft.Maui.Graphics; |
In the body of the Index method add
| C#
Copy Code
|
|---|
DiagramView view = new DiagramView("diagramView1"); |
The code above creates a new DiagramView object with Id set to "diagramView1".
Change some properties of the view's Diagram object:
| C#
Copy Code
|
|---|
Diagram diagram = view.Diagram; DiagramStyle style = new DiagramStyle(); |
Diagram's BackBrush property defines the default color with which the interior of the diagram will be filled. Diagram's LinkHeadShape and LinkHeadShapeSize properties define the default base shape and size for links' ending arrowhead. Additional styles can be applied to the diagram items by using the diagram's Style property.
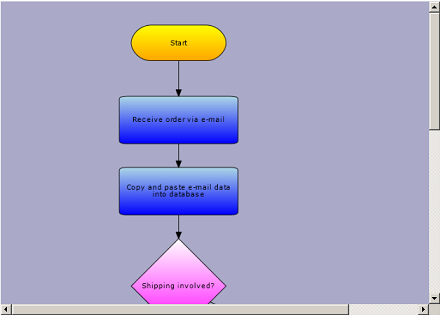
Add the following code to add some ShapeNodes to the diagram. ShapeNode objects can be drawn as various geometric shapes, as set through their Shape property. There are over 100 predefined shapes exposed as static members of the Shapes class. The Shape property can be set to one of the predefined shapes: RoundRect, Rectangle, Ellipse, Process, Procedure, Delay and much more.
| C#
Copy Code
|
|---|
// add some nodes and links to the view's Diagram ShapeNode node2 = diagram.Factory.CreateShapeNode(new Rect(50, 40, 50, 20)); ShapeNode node3 = diagram.Factory.CreateShapeNode(new Rect(50, 70, 50, 20)); ShapeNode node4 = diagram.Factory.CreateShapeNode(new Rect(55, 100, 40, 40)); ShapeNode node5 = diagram.Factory.CreateShapeNode(new Rect(100, 135, 50, 20)); ShapeNode node6 = diagram.Factory.CreateShapeNode(new Rect(100, 165, 50, 20)); ShapeNode node7 = diagram.Factory.CreateShapeNode(new Rect(100, 195, 50, 20)); ShapeNode node8 = diagram.Factory.CreateShapeNode(new Rect(55, 230, 40, 15)); |
Add the following code to add some DiagramLinks to the diagram:
| C#
Copy Code
|
|---|
diagram.Factory.CreateDiagramLink(node1, node2); |
Finally, store the newly created view in the ViewBag dictionary:
| C#
Copy Code
|
|---|
ViewBag.DiagramView = view; |
From the main menu choose Debug->Start without debugging or press CTRL+F5. The image below depicts how the application would look like: