This tutorial shows how to define a custom node class that inherits CompositeNode and adds several new properties. Its appearance is defined using an XML template.
1. Follow the Eclipse or Android Studio guide to create a new Android project and add a DiagramView to its main Activity.
2. Right-click the project's assets folder and choose New -> File from the context menu (If using Android Studio, you might have to create assets folder first by selecting New -> Folder -> Assets Folder from app's context menu). Create a new XML file called OrgChartNode.xml and add the following template code to it.
Xml
 Copy Code Copy Code
|
|---|
<SimplePanel> <Shape Name="Shape" Shape="Rectangle" /> <Border Padding="2">
<GridPanel>
<GridPanel.Columns>
<GridColumn Width="30" />
<GridColumn />
</GridPanel.Columns>
<GridPanel.Rows>
<GridRow />
</GridPanel.Rows> <Image Name="Image" /> <StackPanel Orientation="Vertical" GridColumn="1">
<Text Name="Title" Font="Arial-6" TextAlignment="Near" />
<Text Name="FullName" Font="Arial-4" TextColor="Blue" TextAlignment="Near" />
<Text Name="Text" Font="Arial-4" TextAlignment="Near" />
</StackPanel>
</GridPanel>
</Border> </SimplePanel> |
3. Add to the project a new class called OrgChartNode. Make it derive from CompositeNode.
| Java
Copy Code
|
|---|
package com.mindfusion.tutorial3; import java.io.InputStream;
import java.util.Scanner; import android.content.Context;
import android.graphics.Bitmap; import com.mindfusion.diagramming.*;
import com.mindfusion.diagramming.components.*;
import com.mindfusion.drawing.Color;
public class OrgChartNode extends CompositeNode
{
public OrgChartNode(Diagram diagram, Context context)
{
super(diagram);
String xmlTemplate = loadXmlFile("OrgChartNode.xml", context);
}
private ShapeComponent shape;
private ImageComponent image;
private TextComponent title;
private TextComponent fullName;
private TextComponent text;
}
|
4. In the constructor, load from the XML template using XmlLoader, and assign references to individual components using findComponent:
| Java
Copy Code
|
|---|
// create components from XML template
getComponents().add(XmlLoader.load(xmlTemplate, null, null)); // find components by name
shape = (ShapeComponent) findComponent("Shape");
image = (ImageComponent) findComponent("Image");
title = (TextComponent) findComponent("Title");
fullName = (TextComponent) findComponent("FullName");
text = (TextComponent) findComponent("Text");
// customize appearance
title.getTextFormat().setHorizontalAlign(Align.Near);
fullName.getTextFormat().setHorizontalAlign(Align.Near);
text.getTextFormat().setHorizontalAlign(Align.Near);
shape.setIsOutline(true);
setFill(new SolidBrush(Color.WHITE));
setStroke(new Pen(0.5f, Color.BLACK)); |
5. Define custom properties that delegate their implementation to the components loaded from the template.
| Java
Copy Code
|
|---|
public Pen getStroke()
{
return shape.getPen();
} public void setStroke(Pen value)
{
shape.setPen(value);
this.repaint();
} public Brush getFill()
{
return shape.getBrush();
} public void setFill(Brush value)
{
shape.setBrush(value);
} public Image getImage()
{
return image.getImage();
} public void setImage(Image value)
{
image.setImage(value);
} public String getTitle()
{
return title.getText();
} public void setTitle(String value)
{
title.setText(value);
} public String getFullName()
{
return fullName.getName();
} public void setFullName(String value)
{
fullName.setText(value);
} public String getText()
{
return text.getText();
} public void setText(String value)
{
text.setText(value);
} |
6. Create a few instances of the OrgChartNode class from the activity's onCreate override.
| Java
Copy Code
|
|---|
// create first OrgChartNode
OrgChartNode node1 = new OrgChartNode(diag);
node1.setStroke(new Pen(0.5f, Color.RED));
node1.setBounds(20, 10, 80, 40);
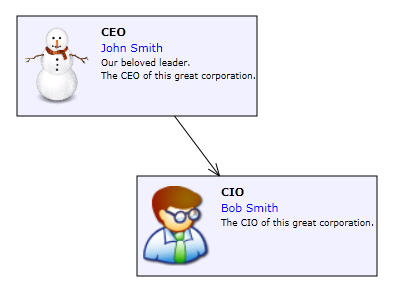
node1.setTitle("CEO");
node1.setFullName("John Smith");
node1.setText("Our beloved leader.\n" +
"The CEO of this great corporation.");
node1.setImage(loadImage("image1.png"));
diag.add(node1); // create second OrgChartNode
OrgChartNode node2 = new OrgChartNode(diag);
node2.setBounds(60, 60, 80, 40);
node2.setTitle("CIO");
node2.setFullName("Bob Smith");
node2.setText("The CIO of this great corporation.");
node2.setImage(loadImage("image2.png"));
diag.add(node2); // create connector
diag.getFactory().createDiagramLink(node1, node2); |
7. Build and run the project. You should see the custom nodes rendered like this: